 |
| Truck and Minnie Mouse |
Wednesday, September 18, 2013
Two Cakes
The Twins just turned 4!! How time is flying!! They requested two cakes this year: a truck, and Minnie Mouse! So, after much though, planning, and 3.5 hours work, here are the results!!

Monday, September 16, 2013
Soup and Sorbet
This past weekend was a cooking weekend!
And then we made Raspberry-Blackberry Sorbet!! It was super easy and delicious! We found the recipe in my new birthday present cookbook- awesome!
I made a special birthday dinner for Sean, involving Bobotie, raspberry-blackberry Crumble and a really really nice bottle of Groot Constantia's 2011 Constantia Rood red.... It was really really yummy!! The Bobotie worked well, despite some complications in cooking time. The crumble was really nice and the wine... Oh the wine was AMAZING!!!! No phone photos, so will upload camera photos later.
Other cooking involved a no-recipe scratch chicken soup:
 |
| Chicken Vegetable Soup |
 |
| Pre-blended... ends up bright pink! |
Fruit Sorbet
Ingredients:
1 lbs frozen berries
1/2 cup yoghurt
1/4 cup sugar
2 tablespoons water.
Method:
Blend in food processor just enough to breakdown the berries, but not too muh else they liquefy. We ate immediately, but could also put back in freezer...
Blend in food processor just enough to breakdown the berries, but not too muh else they liquefy. We ate immediately, but could also put back in freezer...
Tuesday, July 9, 2013
Quinoa Salad
For the same BBQ as the Raspberry Brie Bites, I also made a Zesty Quinoa Salad, again the recipe was found online.
I'm new to quinoa, so this was an easy adventure into that world.

Zesty Quinoa Salad
Ingredients:
200g quinoia
200g quinoia
2 cups of water
2 limes, juiced
1.5 cups cherry tomatoes, halved
1/4 cup cilantro, chopped
4 green onions, thinly sliced
1/4 cup extra virgin olive oil
2 teaspoons ground cumin
1/2 teaspoon chili flakes
1 can black beans, drained
salt and pepper to taste.
Method:
Cook the quinoia and water - same method as rice, 15 minutes. Set aside to cool.
Chop up the tomatoes, onions, cilantro etc. Set aside.
Mix dressing: olive oil, lime juice, cumin, chili flakes, whisked together.
Combine all ingredients, mix well. Chill, then serve.
I'm not entirely sold on it, but it's not terrible. I shall do further experiments.
Party Results:


Raspberry Brie Bites

Raspberry Brie Bites

Ingredients:
Brie cheese - enough to cut 32 small bites.
Puff Pastry - a package with 2 rolls, or enough to make 32 squares.
Raspberries
Jam/fruit preserve
 Method:
Pre-prepare the cheese by cutting the 32 pieces. Keep in fridge to maintain consistency.

Roll out half of the dough, using some flour on the rolling surface and rolling pin to avoid sticking. Cut into 4, and then 4 again. Eventually you will have 32 squares.
Dollop jam into the center of the pastry. Then add a raspberry and a piece of brie.
 Decide how you want to 'close' the pastries. I found bunching up all 4 corners, using some water, to be the most efficient. Another method would be to create mini turnovers. Be sure to press the edges of pastry togther very tightly.
Bake at 400 for 15 minutes. Watch carefully - the pastry edges will separate and the jam and cheese tends to run 'out' of the pastries. The firmer you press the pastry edges together, the better.
Cool for a few minutes, and then serve warm.
Observations:
I made these with boysenberry jam, my favourite. They were delicious warm. I had to serve them cold at the BBQ, but people still seemed to enjoy them.


Mulligatawny Soup
 |
| Curry Soup for the Win! |
Original Recipe
Mulligatawny Soup
Ingredients:
1/2 cup chopped onion
2 stalks celery, chopped
1 carrot, diced
1/4 cup butter
1 1/2 tablespoons all-purpose flour
1 1/2 teaspoons curry powder
4 cups chicken broth
1/2 apple, cored and chopped
1/4 cup white rice
1 skinless, boneless chicken breast half - cut into cubes
salt to taste
ground black pepper to taste
1 pinch dried thyme
1/2 cup heavy cream, heated
Method:
Saute onions, celery, carrot, and butter in a large soup pot. Add flour and curry, and cook 5 more minutes. Add chicken stock, mix well, and bring to a boil. Simmer about 1/2 hour. Add apple, rice, chicken, salt, pepper, and thyme. Simmer 15-20 minutes, or until rice is done. When serving, add hot cream.
Mini Raspberry Blackberry Crumble
One night I was suddenly craving crumble. Then I remembered I have little ramekins, and decided to experiment how many personalized crumbles I could make with the same recipe as a proper crumble... the answer is: 6! And they freeze quite well too! Horrah!
Raspberry Blackberry Crumbles:
See previous Apple Crumble post (also, super secret).
Put in frozen raspberries and blackberries into little ramekin, cover with crumble, bake for 30min at 350 F, let cool a few minutes, and enjoy!!
YUM!
 |
| Delicious! |
Ducky Cake
Made this set of cakes for my nieces 2nd Birthday... and I think it is safe to say it was a hit!!
 |
| Quaaak! |
Wednesday, May 15, 2013
Cooking updates
Sorry for the lack of posts recently. I've been doing lots of cooking, but all the recipes have been repeats, so it didn't make sense to post about them! I've done the chicken satay one again, as well as some of the baked goods... had a girly party with impromptu lava cakes and then of course my standard banana bread snacks.
I certainly inspired to keep going, and have recently re-organized all my hand-written or photocopied recipes into a nice binder. I promise to photo and post as I make new things, as that's what this is all about!!!
I certainly inspired to keep going, and have recently re-organized all my hand-written or photocopied recipes into a nice binder. I promise to photo and post as I make new things, as that's what this is all about!!!
Wednesday, March 6, 2013
Soup Sista!
I went to a fundraiser last fall called Soup Sisters. While there I purchased their soup cook book. I've made a few from them, and have really enjoyed them! I have neglected to post about them, so figured at the very least I'd post a photo.
The one on the left is a Sweet Potato, Red Lentil, Carrot Curry soup, and the one on the right is a Tomato Potato soup. Both are really good!! I'll try post the recipe sometime soon!
The one on the left is a Sweet Potato, Red Lentil, Carrot Curry soup, and the one on the right is a Tomato Potato soup. Both are really good!! I'll try post the recipe sometime soon!
 |
| Soup! |
Fudge Torte
As predicted, I've been cooking up a storm recently. The bad news: I've been really bad at documenting this... so it begs the questions: if there isn't a photo, did it happen?
This being said, I made a new recipe for the office and it received rave reviews yesterday, so I thought I'd post about it. I don't have any photos, but this is better than nothing! I found it on a post card, so I'm not sure who the original chef was...
Fudge Torte
Ingredients:
1/2 cup sugar
4 large eggs
2 large egg yolks
1 cup chocolate chips
3/4 cup butter
1/3 cup seedless preserves
1/3 cup flour
1/8 tsp salt
Method:
Preheat oven to 325F. Whip sugar, eggs and yolks for about 5 minutes. Heat the utter and chocolate in a sauce pan until melted. Remove from heat and whisk in the preserves. I used boysenberry jam, but I think this would be great with raspberry, or any other slighly tart berry. Fold into egg mixture, then mix in flour and salt. Pour into greased pan (you could sprinkle a little sugar around the edges for a little different texture). Bake for 25 minutes. Serve chilled.
This was a super easy dish to make and everyone who has had it has enjoyed it. If I were offering this up at a dinner party, I'd probably sprinkle the top with icing sugar, or else try create a raspberry sauce/coulis and serve with some real berries. Yum yum!
In other cooking news, I've been baking a lot. I've remade those pecan muffins a few times, and am working on perfecting banana bread - I've had a few different recipes to try. I've recently discovered that my oven is approx 25 - 30 degrees (F) hotter than the dial says, so this explains some of the cooking disasters! I've begun amending recipies to fit. I've been experimenting with the different herbs and spices I bought when I first moved in (I think I have 50+)... but I'm not great at being adventurous with them due to fear of 'messing up' a meal. I've just bought a herb & spice book off Amazon so hopefully that'll help me learn and experiment!
This being said, I made a new recipe for the office and it received rave reviews yesterday, so I thought I'd post about it. I don't have any photos, but this is better than nothing! I found it on a post card, so I'm not sure who the original chef was...
 |
| Boysenberry Fudge Torte |
Ingredients:
1/2 cup sugar
4 large eggs
2 large egg yolks
1 cup chocolate chips
3/4 cup butter
1/3 cup seedless preserves
1/3 cup flour
1/8 tsp salt
Method:
Preheat oven to 325F. Whip sugar, eggs and yolks for about 5 minutes. Heat the utter and chocolate in a sauce pan until melted. Remove from heat and whisk in the preserves. I used boysenberry jam, but I think this would be great with raspberry, or any other slighly tart berry. Fold into egg mixture, then mix in flour and salt. Pour into greased pan (you could sprinkle a little sugar around the edges for a little different texture). Bake for 25 minutes. Serve chilled.
This was a super easy dish to make and everyone who has had it has enjoyed it. If I were offering this up at a dinner party, I'd probably sprinkle the top with icing sugar, or else try create a raspberry sauce/coulis and serve with some real berries. Yum yum!
 |
| Banana Bread Loaves |
Sunday, January 20, 2013
Pecan Pie Muffins
I found this recipie online (via Pintrest) and decided it was worth an attempt... and YUM!! Definitely worth it!!
 |
| Small bite of deliciousness |
Ingredients:
1 cup firmly packed brown sugar
1 cup chopped pecans
1/2 cup all-purpose flour
1/2 tsp baking powder
1/4 tsp salt
1/2 cup melted butter
2 eggs
1 tsp vanilla extract
cooking spray
1/2 cup finely chopped pecans
Method:
Preheat oven to 400°. Combine first 5 ingredients in a large bowl. Melt butter, mix with eggs and vanilla. Add butter mixture to bowl, stir. Prep mini-muffin tins with cooking spray or cupcake liners. Place 1 tsp. finely chopped pecans in each muffin cup, then spoon in batter. Bake at 400° for 10min or so. Cool and remove from pans.
I've made this recipe a twice now - the first time I followed it exactly, and the second time I did half pecans, half chopped up chocolate chips. I also didn't do the finely chopped pecans at the bottom of the muffin cups the second time - was too much of a mess the first round. Both versions were delicious and garnered rave reviews from coworkers and friends!! I'd recommend them for sure!
Thursday, December 20, 2012
Shortbread shivers...
I made some cookies, cupcakes and shortbread last night. The cookies and cupcakes were with a friend, so I can't claim them up here, but suffice to say having a mixer is helpful when making dough... related: I've gotten quite good at kneading...
Anyway, I was making the shortbread following some notes I made last year. Unfortunately my notes were wrong: I was using half the butter I needed!! I belatedly tried to fix it but unfortunately the product is rather floury. I brought them to the office to feed the hoard... They haven't been snapped up as quickly as my cookies last week but I've still had some pleased remarks... If only they'd turned out properly!!
Ah well. Bake and learn!
Anyway, I was making the shortbread following some notes I made last year. Unfortunately my notes were wrong: I was using half the butter I needed!! I belatedly tried to fix it but unfortunately the product is rather floury. I brought them to the office to feed the hoard... They haven't been snapped up as quickly as my cookies last week but I've still had some pleased remarks... If only they'd turned out properly!!
Ah well. Bake and learn!
 |
| Shortbread (bad photo!) |
Wednesday, December 19, 2012
Baking time!
I've been baking up a storm the past few weeks! So much so, that I'm afraid I haven't been properly documenting each adventure!
Suffice to say, the oven in my new flat is quite different to the one at Mum's... and therefore I've had some interesting... challenges... figuring out baking times.
My first go at cookies this season were the traditional cinnamon cookies, detailed elsewhere in this blog. They burned to a crisp. Mum ate them, but that was about it.
I also made some almond squares (my favourite), but once again they burned. I made my way through them slowly, and plan to make another batch sometime soon.
I was more daring with some cookies I made for the office. I found the recipe in one of those gossip rag magazines - Almond Jam cookies. They took quite a bit of work to make - first I had to make the cookie dough, roll it out, use cookie cutters, bake, warm up jam, and then create cookie sandwiches. I had a lot of fun, but it was labour intensive!
They were a huge hit at the office - they disappeared in about an hour, with many pronouncements of 'yummy' made. I'll try them again sometime, perhaps trying to tweak the recipe so the cookies have a stronger flavour.
I then decided to really have fun, and tried to re-create a childhood favourite: Jam Tarts. The recipe for the pastry is lost in time, so I had to figure something out... being slightly pressed for time, I ended up using the pastry recipe on the cristco package. It's alright, but not fantastic. I'll have to experiment again. The largest lesson I learned in making these tarts was that you need to make deeper 'wells' and put less jam, as I had a bit of a... sticky... situation:
A few made it out alright, so here's what I was aiming for:
My most recent baking fun has been Banana Bread. A friend faxed me the recipe ages ago (so long that I can't remember which friend!! oops!)... I'm typing this entry up at the office and I don't have the recipe with me, but suffice to usay it was easy enough for me. Lesson learned: don't freeze bananas and then thaw them overnight in the fridge, without a plate or bowl underneath, unless you want to do a full-fridge scrub down... ahem.
No photo of this one, much to my chagrin. I made 8 baby loaves and they are so cute!!!
More baking is coming up, tonight and this weekend, so stay tuned! :)
Suffice to say, the oven in my new flat is quite different to the one at Mum's... and therefore I've had some interesting... challenges... figuring out baking times.
My first go at cookies this season were the traditional cinnamon cookies, detailed elsewhere in this blog. They burned to a crisp. Mum ate them, but that was about it.
I also made some almond squares (my favourite), but once again they burned. I made my way through them slowly, and plan to make another batch sometime soon.
I was more daring with some cookies I made for the office. I found the recipe in one of those gossip rag magazines - Almond Jam cookies. They took quite a bit of work to make - first I had to make the cookie dough, roll it out, use cookie cutters, bake, warm up jam, and then create cookie sandwiches. I had a lot of fun, but it was labour intensive!
 |
| Almond Boysenberry Cookies |
I then decided to really have fun, and tried to re-create a childhood favourite: Jam Tarts. The recipe for the pastry is lost in time, so I had to figure something out... being slightly pressed for time, I ended up using the pastry recipe on the cristco package. It's alright, but not fantastic. I'll have to experiment again. The largest lesson I learned in making these tarts was that you need to make deeper 'wells' and put less jam, as I had a bit of a... sticky... situation:
 |
| They should not look like this!! |
 |
| Boysenberry Jam Tart |
No photo of this one, much to my chagrin. I made 8 baby loaves and they are so cute!!!
More baking is coming up, tonight and this weekend, so stay tuned! :)
Sunday, November 4, 2012
Dinner Party!
Last night I hosted my first dinner part at my new flat! Had a lot of fun doing it, and gained a new appreciation for how long it take to pull these things together!!
The Menu:
To Start: Spicy Cheese Sticks paired with Gonzalez Byass Oloroso sherry
Main: Satay Chicken skewers served with rice, peas, a spicy peanut sauce and tadzhik, paired with a BC wine - Little Straw's 2009 Sauvignon Blanc
Desert: Apple Turnovers and mint tea.
I have previously posted on how to make the cheese sticks. The only alteration was that I added about a teaspoon of cayenne pepper, and that give them quite a kick. Next time I plan to use some jalapeno cheese for another option. I chose sherry as the pairing drink due to the oloroso sweetness, as a nice counter to the spice... delicious!
Both the Satay marinade and the Peanut sauce are recipes from my Dad, and I am not to divulge their secrets. I will post photos though!
The Sauvignon Blanc was a really good pairing with the spice. Wasn't too sweet, but also not overly dry. Was nice on it's own, but a really good mix with the meal.
I made both the marinade and sauce a few days early, and upon taste-testing I was a bit concerned how spicy they were. After speaking with some co-workers I resolved to make a cooling sauce to assist with the menu. I first looked for the Indonesian 'raita' but decided on a tadziki as I had more the ingredients.
Tadziki
8 oz plain yoghurt
1 cucumber
1 tbsp fresh dill
2 tbsp olive oil
1/2 lemon, juiced
some salt & pepper.
garlic to taste
Method: Peel the cucumber. Add all ingredients into food processor, blend.
Thoughts: this was very runny. I think making it with greek yoghurt will help, and perhaps 'shredding' the cucumber with a cheese grater, and then mixing it all together by hand may be a new way to go. Tastes really good though!
The apple turnovers worked far better than I'd anticipated and I was really pleased with them. I used store-bought puff pastry as I was running out of time and, frankly, have never made pastry before!
The filling was a bit of a hodge-podge. I had the leftover apple 'mush' from my apple post (see previous entry) and I wanted to use it up. I put it on the stove and reduced it down to an apple sauce, and then followed a recipe I found online.
I added this all to the mush:
1 cup brown sugar
1 tsp cinnamon
1 tbsp corn starch (first mixed with 1 tbsp cold water).
It needed some texture, so I took my final fresh picked apple, peeled, cored and sauteed in butter, to the mix, and let it cook enough to get a little soft. I then rolled out the puff pastry, cut into squares and dolloped some of the mush into the center of each square, joining the corners to create little triangles. This was a more difficult process than anticipated, and they didn't look very professional, but that's ok.
Once they'd cooled I made a drizzle icing out of some icing sugar, milk and vanilla. It was rather yummy! I served these with mint tea.
All in all, I'm rather pleased with the outcome.
 |
| table all ready! |
To Start: Spicy Cheese Sticks paired with Gonzalez Byass Oloroso sherry
Main: Satay Chicken skewers served with rice, peas, a spicy peanut sauce and tadzhik, paired with a BC wine - Little Straw's 2009 Sauvignon Blanc
Desert: Apple Turnovers and mint tea.
 |
| Spicy cheese sticks & sherry |
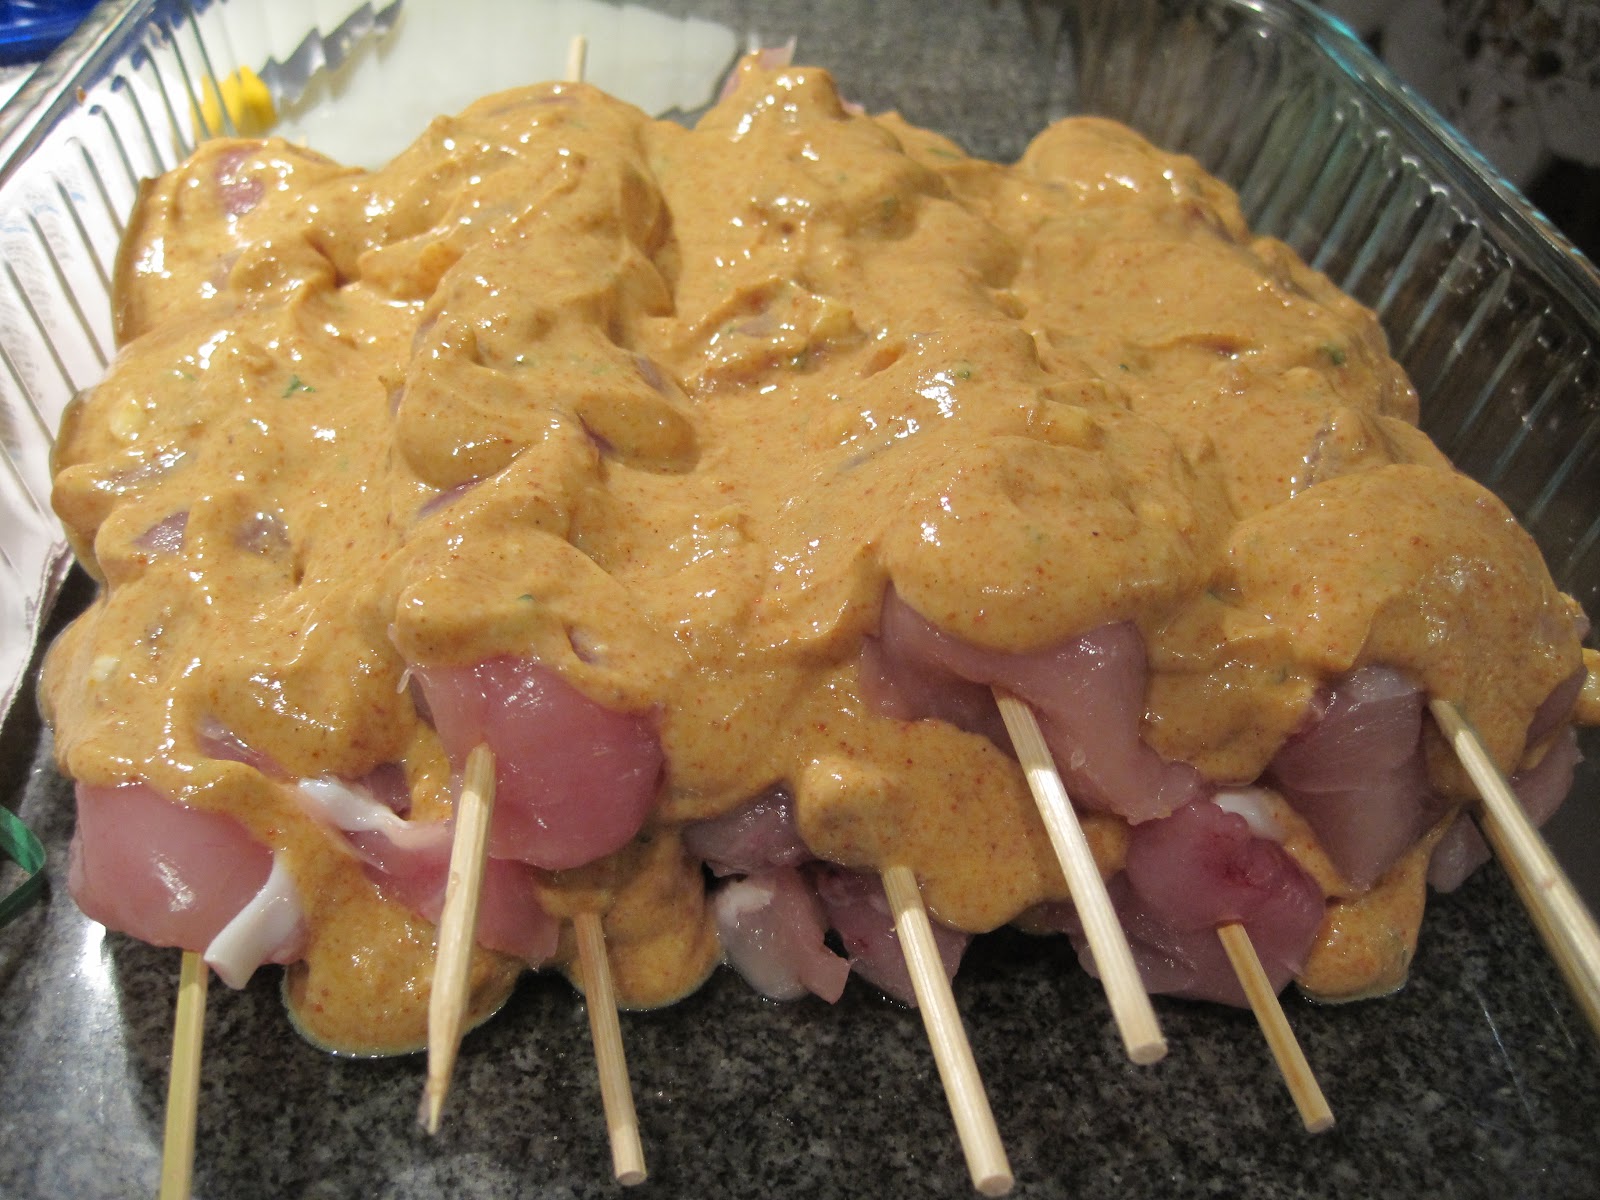 |
| 2 day marinade |
The Sauvignon Blanc was a really good pairing with the spice. Wasn't too sweet, but also not overly dry. Was nice on it's own, but a really good mix with the meal.
I made both the marinade and sauce a few days early, and upon taste-testing I was a bit concerned how spicy they were. After speaking with some co-workers I resolved to make a cooling sauce to assist with the menu. I first looked for the Indonesian 'raita' but decided on a tadziki as I had more the ingredients.
Tadziki
 |
| Evidence |
1 cucumber
1 tbsp fresh dill
2 tbsp olive oil
1/2 lemon, juiced
some salt & pepper.
garlic to taste
Method: Peel the cucumber. Add all ingredients into food processor, blend.
Thoughts: this was very runny. I think making it with greek yoghurt will help, and perhaps 'shredding' the cucumber with a cheese grater, and then mixing it all together by hand may be a new way to go. Tastes really good though!
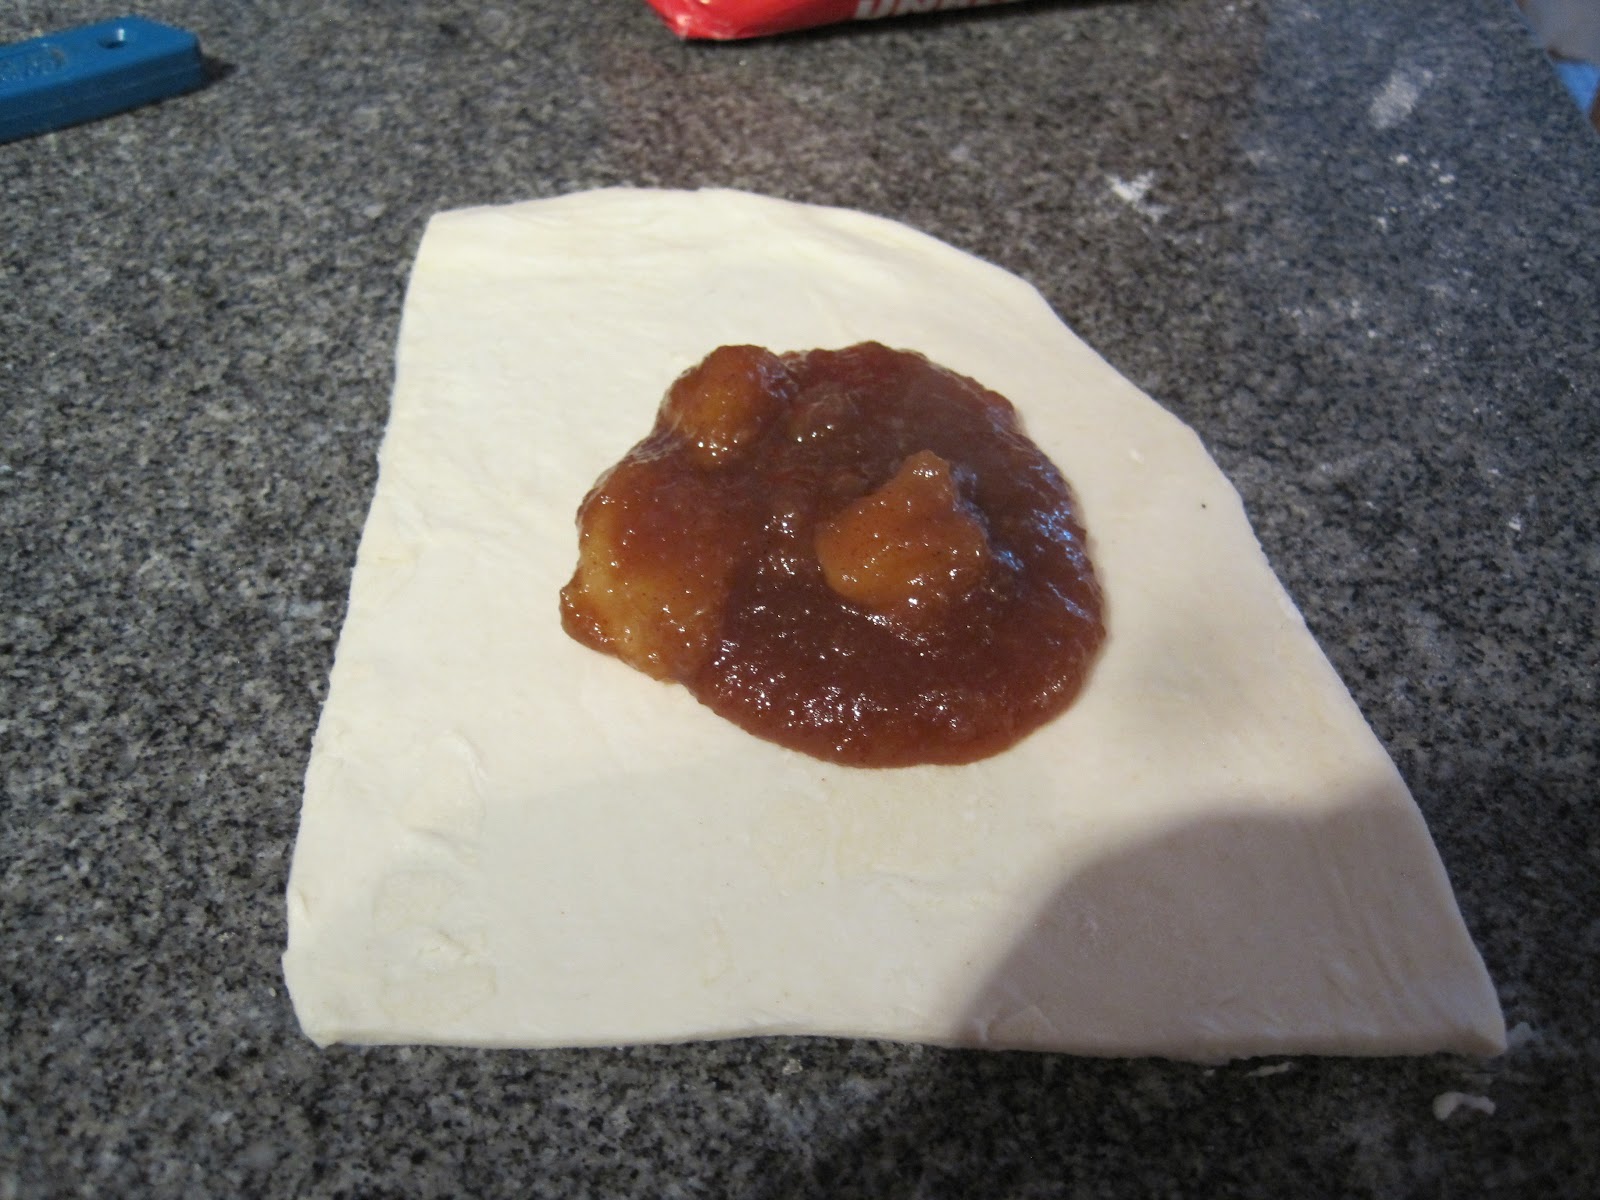 |
| Apple mush turnovers |
The filling was a bit of a hodge-podge. I had the leftover apple 'mush' from my apple post (see previous entry) and I wanted to use it up. I put it on the stove and reduced it down to an apple sauce, and then followed a recipe I found online.
I added this all to the mush:
1 cup brown sugar
1 tsp cinnamon
1 tbsp corn starch (first mixed with 1 tbsp cold water).
 |
| Final product |
Once they'd cooled I made a drizzle icing out of some icing sugar, milk and vanilla. It was rather yummy! I served these with mint tea.
All in all, I'm rather pleased with the outcome.
Monday, October 22, 2012
Apples!
I went to visit some old friends in Campbell River recently and part of the weekends adventures included picking apples. Fast forward to this past weekend, I finally had some time to deal with them! I have not played with apples before so this was quite exciting. As usual I made some pretty big mistakes, but had fun an have learned for next time!
Apple Sauce
Ingredients:
6 Apples, peeled, cored, sliced
1/2 cup water
1/2 cup sugar
Method:
Simmer apples in the water until soft. Mash up apples, add in sugar, reduce until thick and 'saucy'.
I wasn't paying attention to the recipe. This was bad. When I was preparing the apples I just plunked them in a bunch of water (about 6 cups) to try prevent the quick browning of the apples. I then simply poured the whole lot into a pan to boil, not realizing the fine points of the apple-to-water ratio. DOH!!
No harm though, as I simply reduced the heat, removed the lid, and allowed the water to slowly boil off. The little taste test I did said tells me that its going to be delicous! Now to figure out what to do with it...
Apple Pie Filling
Ingredients:
A bunch of apples
water
Method:
Can't really say, as I screwed it up so badly!
So while making the apple sauce, I also decided to prepare some apples to be frozen and available for apple pie.. unfortunately I again didn't think through the water ratios, and, to make matters worse, I left the kitchen. Turns out apples stay solid for a long time, then suddenly disintegrate... In my frezer I currently have 2 large zip-lock bags full of what I am now calling 'Apple Water'.. I'll try use it in baking.. I may try remove one of the bags and 'boil down' the liquid a la the apple sauce, but we'll see.. I need to research this one a bit more!
 |
| A sample... |
| I had quite a few apples to deal with. I wasn't sure what I should do with them and asked around for some ideas or recipes. In the end I decided upon Apple Sauce, Apple Butter, and Apple Pie Filling... one of these REALLY didn't work... To start all of them, I had to prepare the apples: |
 | |
| apple-peeler-corer-slicer!! |
 This recipe came from the friend in Campbell River. Not sure where she found it; if I ever find out I'll post it. I modified by halving the recipe. Ingredients 5 1/2 lbs of Apples, peeled, cored and chopped 4 cups Sugar 2 tsp cinnamon 1/4 tsp salt 1/4 tsp ground cloves Method Very simple: mix all ingredients together, put in slow cooker. Cook on high for 1 hour, then on low for 9 - 11 hours. Remove the lid for the last hour. I suspect my slow cooker, being so tiny, isn't as powerful as others are, so mine took a bit longer. I also didn't have the full disintegration of apples like I saw in some recipes online, so I used an immersion blender to make it all smooth. FYI, for all that this is called 'butter', it has nothing to do with butter... it's better described as 'apple jam'. |
 |
| Apple Butter in progress |
Ingredients:
6 Apples, peeled, cored, sliced
1/2 cup water
1/2 cup sugar
Method:
Simmer apples in the water until soft. Mash up apples, add in sugar, reduce until thick and 'saucy'.
I wasn't paying attention to the recipe. This was bad. When I was preparing the apples I just plunked them in a bunch of water (about 6 cups) to try prevent the quick browning of the apples. I then simply poured the whole lot into a pan to boil, not realizing the fine points of the apple-to-water ratio. DOH!!
No harm though, as I simply reduced the heat, removed the lid, and allowed the water to slowly boil off. The little taste test I did said tells me that its going to be delicous! Now to figure out what to do with it...
Apple Pie Filling
Ingredients:
A bunch of apples
water
Method:
Can't really say, as I screwed it up so badly!
So while making the apple sauce, I also decided to prepare some apples to be frozen and available for apple pie.. unfortunately I again didn't think through the water ratios, and, to make matters worse, I left the kitchen. Turns out apples stay solid for a long time, then suddenly disintegrate... In my frezer I currently have 2 large zip-lock bags full of what I am now calling 'Apple Water'.. I'll try use it in baking.. I may try remove one of the bags and 'boil down' the liquid a la the apple sauce, but we'll see.. I need to research this one a bit more!
 |
| Before everything went horribly wrong!! |
Thursday, September 6, 2012
New tools....
I've acquired a new kitchen (which had a condo attached to it) and therefore expect to be doing quite a bitter cooking...
When I got to the office this morning there was a huge surprise on my desk:
Which turned into this:
How cool is that?!?! House warming gift from the office. Now, I'm not well versed enough in kitchenware but my learned cooking colleagues are all drooling... so I'm taking that as a great sign!!
Lots of fun ahead!!
When I got to the office this morning there was a huge surprise on my desk:
 |
| Big Prezzie from the Office! |
Which turned into this:
 |
| WOW!!! |
How cool is that?!?! House warming gift from the office. Now, I'm not well versed enough in kitchenware but my learned cooking colleagues are all drooling... so I'm taking that as a great sign!!
Lots of fun ahead!!
Sunday, September 2, 2012
Lemon Squares
Well after my first attempt at lemon squares (see below) I was rather disappointed. I've been rather busy with other things, so cooking took it's comfortable place on the back burner. However, so 'other things' coming to a head (see Orkney Adventures soon for more..) I decided to take a weekend to visit family and cooking happened! So it was high time to try again.
I was given the recipe from a friend, who found it online. When I figure out what website, I'll post the link.
Lemon Squares
Ingredients:
1 cup butter, softened
1/2 cup white sugar
2 cups flour
4 eggs
1 1/2 cups sugar
1/4 cup flour
2 lemons, juiced
Method:
Pre-heat oven to 350 F
Base: blend together softened butter, 2 cups of flour and 1/2 cup sugar. Press into bottom of an ungreased 9 x 13 inch pan. Bake for 15 - 20 minutes until firm and golden.
Lemon layer: while the base is baking, whisk together 1 1/2 cups sugar and 1/4 cup flour, then whisk in the eggs and lemon juice. When base is ready, pour lemon mixture over base. Bake for an additional 20 minutes.
Optional: whisk in some lemon zest. Could also sift some icing sugar on top when fully cool. Also an option = making lime bars - same recipe but with lime juice.
Reception:
HUGE HIT!!! They were devoured! I enjoyed them and found them better on the second day. I am contemplating making them again with slightly less sugar in the lemon layer - to test out the tartness levels. But this recipe is definitely a hit.
I was given the recipe from a friend, who found it online. When I figure out what website, I'll post the link.
Lemon Squares
Ingredients:
1 cup butter, softened
1/2 cup white sugar
2 cups flour
4 eggs
1 1/2 cups sugar
1/4 cup flour
2 lemons, juiced
Method:
Pre-heat oven to 350 F
Base: blend together softened butter, 2 cups of flour and 1/2 cup sugar. Press into bottom of an ungreased 9 x 13 inch pan. Bake for 15 - 20 minutes until firm and golden.
Lemon layer: while the base is baking, whisk together 1 1/2 cups sugar and 1/4 cup flour, then whisk in the eggs and lemon juice. When base is ready, pour lemon mixture over base. Bake for an additional 20 minutes.
Optional: whisk in some lemon zest. Could also sift some icing sugar on top when fully cool. Also an option = making lime bars - same recipe but with lime juice.
Reception:
HUGE HIT!!! They were devoured! I enjoyed them and found them better on the second day. I am contemplating making them again with slightly less sugar in the lemon layer - to test out the tartness levels. But this recipe is definitely a hit.
 |
| Lemon Squares! |
Blackberry jam
 |
| bucket o'berries |
 |
| Picking the berries |
You need the following ratios:
500g of fresh blackberries
1 1/2 cups of sugar
1/4 cup water (not necessary is plump berries).
We used 2000g of berries.
 |
| sugar & berries |
 |
| rolling boil & pops |
After about 30 minutes it should look quite dark and have a rolling boil with a bit of a popping sound to it. Test firmness on a cool plate.
Pour into clean jars- they should be warmed up to prevent shattering.
Pro tip: use a Han blender to reduce the size of the fruit for smooth spreading.
Seal jars and enjoy as you like!
 |
| The finished product |
Sunday, April 29, 2012
Lave Cake
A co-worker of mine found out that I love Lava Cake, and so he told me about one of his favourite chefs from French Food at Home, a TV show on the food network. So we went to the internet and found a recipe by Lara Calder. I just had to try it!!
Lava Cake
Ingredients
4ounces dark chocolate
2/3 cup butter
4 eggs
2/3 cup sugar
1/2 cup flour
Method
"Butter six ramekins, line with a disk of parchment, then butter the parchment (note, I buttered but I didn't use parchment paper - wasn't sure exactly how!).Very gently melt the chocolate and butter together over a water bath. Beat the eggs and sugar until thick, pale, and ribbony. Beat in the flour, and finally the chocolate mixture. Pour into the ramekins and chill.
Just before serving, heat the oven to 400°F/200°C. Place the moulds on a baking sheet and bake until the top is set, 12 to 14 minutes. Remove. Let sit five minutes, before unmoulding onto plates. Serve with caramel sauce or a scoop of ice cream."
Comments
 I hadn't worked with a double boiler before, but it was very easy and actually rather fun melting the chocolate. The entire recipe was pretty user friendly. I also really liked that they had to be chilled - in the future I think I'll be able to make the recipe but not have to bake them all at once (how often will I be cooking for 6?).
 I'm not sure if I have mentioned the issues with the gas oven I use - it heat up to the correct temperature or hold it hot enough, so recipe times are always fluctuating. This was detrimental to my lava cake... at 14 minutes they were still completely liquid on top.. so I baked them for another 5 minutes.... they weren't totally cooked the whole way through, but they certainly didn't have a much lava as I'd like. Next time I'll try baking for 17 minutes and see what happens.
I served them with a scoop of ice cream and a few raspberries. They seemed to be a hit! The occasion was for my Aunt and Uncle visiting from England, so I had lots of taste testers. The treat was summed up as being 'more-ish'. DEFINITELY a repeat-worthy endeavour!
 | |
| Final product, as served. |
Ingredients
4ounces dark chocolate
2/3 cup butter
4 eggs
2/3 cup sugar
1/2 cup flour
Method
"Butter six ramekins, line with a disk of parchment, then butter the parchment (note, I buttered but I didn't use parchment paper - wasn't sure exactly how!).Very gently melt the chocolate and butter together over a water bath. Beat the eggs and sugar until thick, pale, and ribbony. Beat in the flour, and finally the chocolate mixture. Pour into the ramekins and chill.
Just before serving, heat the oven to 400°F/200°C. Place the moulds on a baking sheet and bake until the top is set, 12 to 14 minutes. Remove. Let sit five minutes, before unmoulding onto plates. Serve with caramel sauce or a scoop of ice cream."
Comments
 I hadn't worked with a double boiler before, but it was very easy and actually rather fun melting the chocolate. The entire recipe was pretty user friendly. I also really liked that they had to be chilled - in the future I think I'll be able to make the recipe but not have to bake them all at once (how often will I be cooking for 6?).
  I'm not sure if I have mentioned the issues with the gas oven I use - it heat up to the correct temperature or hold it hot enough, so recipe times are always fluctuating. This was detrimental to my lava cake... at 14 minutes they were still completely liquid on top.. so I baked them for another 5 minutes.... they weren't totally cooked the whole way through, but they certainly didn't have a much lava as I'd like. Next time I'll try baking for 17 minutes and see what happens.
 I served them with a scoop of ice cream and a few raspberries. They seemed to be a hit! The occasion was for my Aunt and Uncle visiting from England, so I had lots of taste testers. The treat was summed up as being 'more-ish'. DEFINITELY a repeat-worthy endeavour!
 |
| Lava! |
Saturday, April 21, 2012
Kit Kat Cake
 |
| The tools. |
 |
| Kit Kat exterior. |
 | |
| Secured with bow. |
 |
| Brightness! |
Subscribe to:
Posts (Atom)